Shooting the Giant's Causeway.....
Next, I placed an ND8 (Neutral Density) filter to the front of the lens being careful not to knock off the manual focus setting. I use square filters in a mount but you can get round filters that screw to the front of the lens, Next step is to do the exposure calculations, fortunately you can get an app to do this for you, mine came with the ND filters I use.
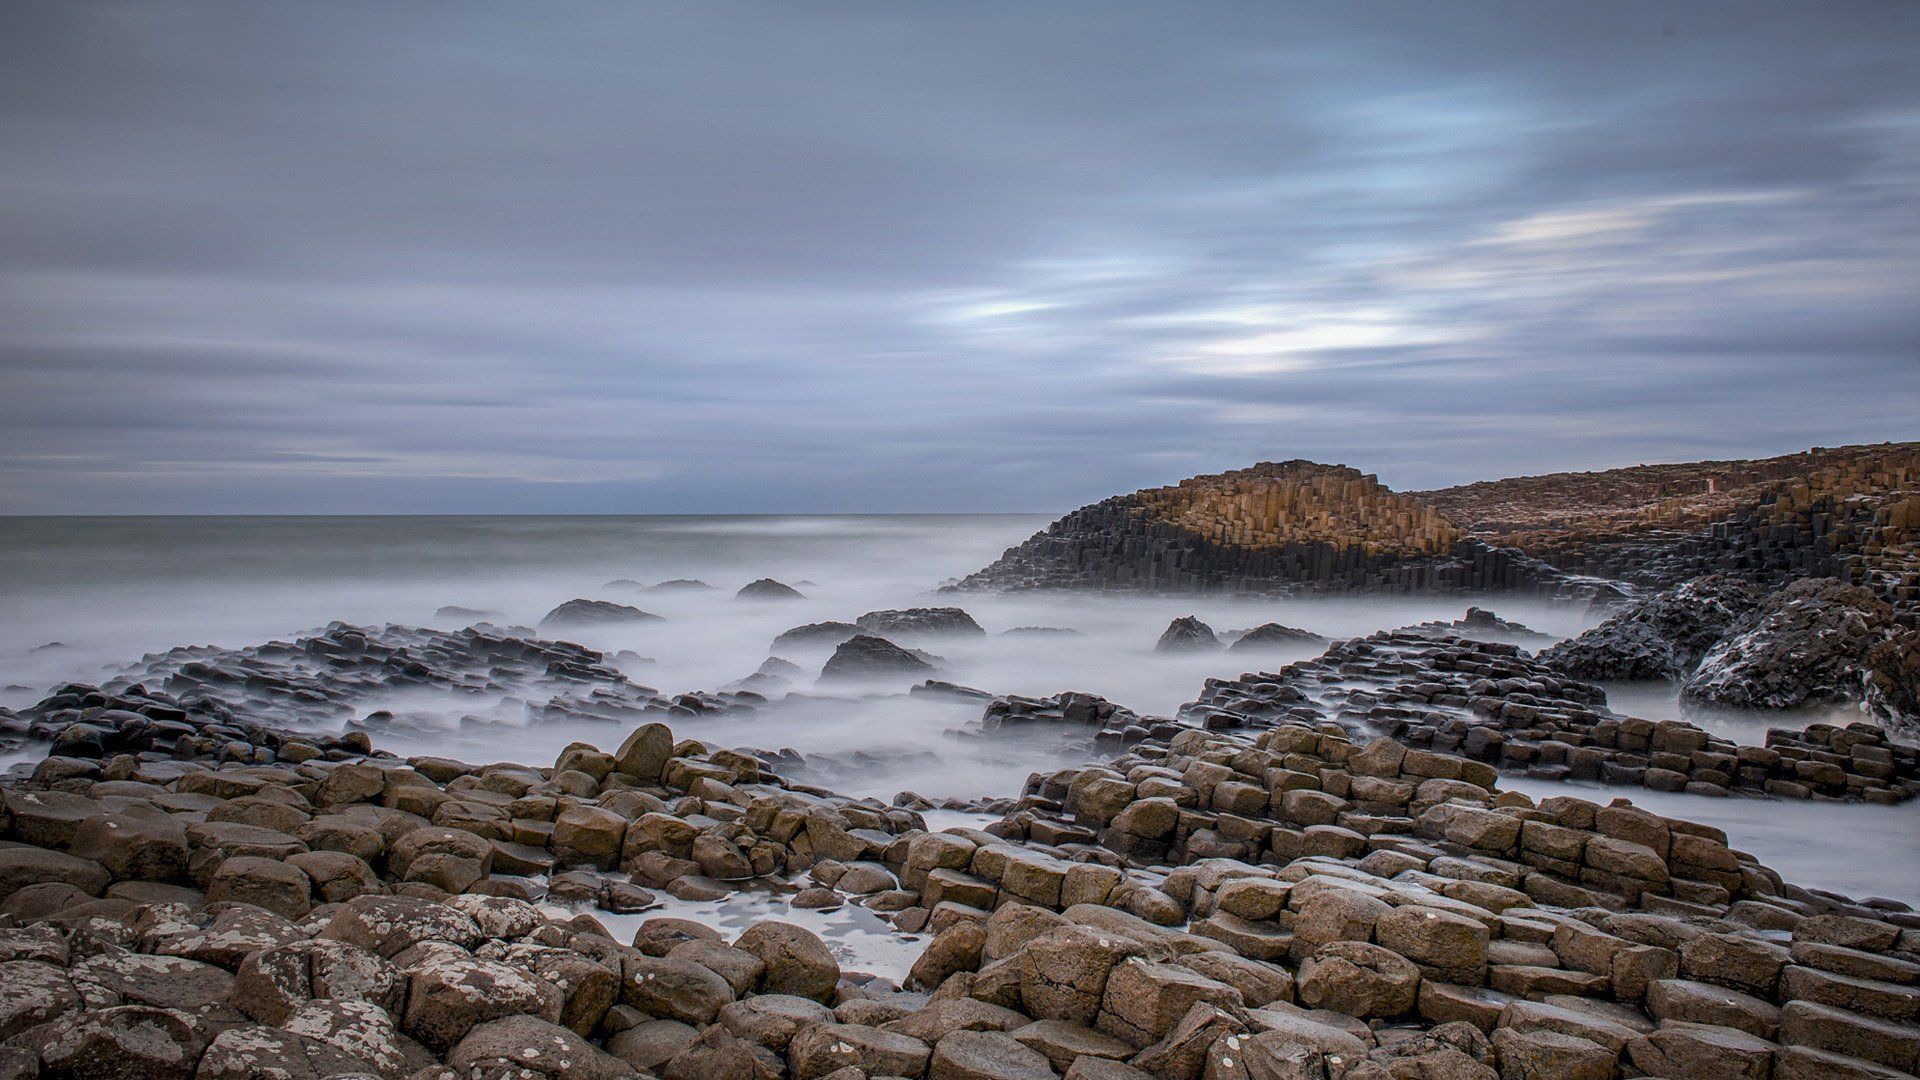
I needed to update the cover image for my website and decided to go for a milky atmospheric sea/cloud shot using the technique known as long exposure. The process I follow is all old school and manual.....apart from the app.
To achieve this misty, milky effect is a really a very simple process.
Make sure the camera you are using has a shutter range above 10 seconds usually they go to 30 seconds and then they have a B mode.
Three elements were important for this shot 1. A good oppressive overcast day with moving clouds. 2. Some wave action over the rocks. 3. A quiet time, this was shot early in the morning before the site had filled up with visitors on what could only be described as a dull overcast day.
I found my position on the Little Causeway looking towards the Middle and Grand Causeway and mounted the camera on a sturdy tripod to composed the shot I wanted.
I then 'manually' focused the shot with an aperture of F11 and an ISO at 200, F11 to give me a reasonable depth of field and 200 ISO to keep grain down to the minimum. Use your cameras light meter reading to get initial settings. I took a shot, reviewed it and tweaked it to where I wanted it to be exposure wise.
I then 'manually' focused the shot with an aperture of F11 and an ISO at 200, F11 to give me a reasonable depth of field and 200 ISO to keep grain down to the minimum. Use your cameras light meter reading to get initial settings. I took a shot, reviewed it and tweaked it to where I wanted it to be exposure wise.
Next, I placed an ND8 (Neutral Density) filter to the front of the lens being careful not to knock off the manual focus setting. I use square filters in a mount but you can get round filters that screw to the front of the lens, Next step is to do the exposure calculations, fortunately you can get an app to do this for you, mine came with the ND filters I use.
All I needed to do was enter the ND filter value (ND8) and the original shutter speed and it worked out the shutter speed to use with the filter, technology is wonderful. If you do not have an app check out the app store where you will find a range of free ones.
The exposure for this shot was around 10 seconds which I set as my new shutter speed. To make sure I got a steady sharp shot, I set the main timer delay on the camera to 2 seconds, then set the shutter delay timer to 3 seconds (not all cameras have this). If you go over the standard 30 seconds you will need to switch into B mode and use a timer, these can be picked up for around £20 or again you can use a phone app as a timer.
Before pressing the shutter button I closed the blind on the eyepiece to prevent light leaking in (you can put a dark cloth over it if there is no blind), I am in the habit of doing it because on occasions light can leak through on long exposures....sometimes that can be interesting.
Then I took the shot, reviewed the image on screen and tried a couple of different shutter speed settings around it and that was it. I had to do very little post work as the exposure was just where I wanted it, I added some basic contrast, brightness and colour adjustment. In retrospect I should have put a slightly graduated filter in the sky as there is some blow out in the sky but not enough to worry me for this purpose.
The image was reduced from its native size down to 96dpi /1920 x 1080px for the internet. The original image is 300dpi / 7360px x 4912px which would happily print out to 6-8 feet wide and view superbly from two metre.
That is it, this is a relatively basic exposure technique, many modern cameras including compacts will have a setting for long exposure but if you want to develop this technique beyond 30 seconds and start doing exposures in minutes and beyond then following this basic procedure will work for you.
I hope this helps you get started, if you have any questions drop me an email: www.artwardphotography.com